
Batch file to test ip address range.
This is a cool batch script that I found to ping a range of IP addresses and report whether they respond to the ping.
Simply copy and paste this code into a notepad file and save with the bat extension (remember to enclose the save as file name in quotes so that it doesnt add a txt extension.

@echo off
SET t=0
:start
SET /a t=t+1
ping -n 1 -l 1 192.168.1.%t% > nul
if %errorlevel%==0 echo Host %t% is UP! >> 192.168.1.%t%-up.txt
if %errorlevel%==1 echo Host %t% is DOWN! >> 192.168.1.%t%-down.txt
IF %t%==999 Exit
Goto start
Privilege Levels in Cisco IOS.
A useful management tool available in IOS is the one that gives you the ability to assign levels of
privilege. Privilege levels are assigned to both users and commands. The privilege levels range
from 0 to 15. By default, commands are assigned either level 1 or level 15. Those commands that
need to be executed in privileged EXEC mode are level 15 commands. With a few exceptions,
those commands that can be executed in user EXEC mode are level 1 command. A small number
of commands are level 0 commands. These commands include enable, disable, exit, logout, and
help. Level 0 commands can be executed at any level.
A user operating in privileged EXEC mode is a level 15 user. A user operating in user EXEC
mode is a level 1 user. Commands and users can be assigned a privilege level different from their
default. The way the privileges work is a higher level has the same rights as the lower levels
beneath it. For instance, a level 10 user (if you set one up) can do everything users at levels 9
through 0 can do. Level 15 users can execute all commands.
Commands can be reassigned a different level of privilege as well. You can raise or lower the
level of privilege on any command. Privilege levels on commands are assigned using the
Privilege command; the command syntax is as follows. Use global configuration mode for this
command.
privilege
This feature is quite useful as it allows us to create various levels of users with custom rights to
IOS commands. Imagine if you had a number of administrators with limited knowledge of the
workings of IOS. But you need their help with certain specific tasks such as shutting down and
re-enabling an interface or adding users to an access server. You can configure the router or
access server so that depending upon the password provided, the user will be assigned a specific
level of privilege and will only be allowed to use commands assigned to that level and below.
Privilege levels for users can be set in a number of ways via the IOS. They can be set
permanently on a line using the privilege level command; at the command prompt using the
enable command; or when logging in using the username command.
To set the default privilege level for a line, use the privilege level command in line configuration
mode. The syntax is as follows: privilege level <0 – 15>.
To interactively reset the level of privilege from the command line, use the enable command.
The command syntax is enable <0 – 15>. The command can be executed in any EXEC mode. If
you leave off the level number, the router assumes you mean 15. It is advisable to set up an
“enable secret” password for each level of privilege. Be sure each level’s password is different
and that the passwords are only known to users within the appropriate level. The syntax for this
command is enable secret level <1-15>
The most common way to assign levels of privilege is to do so based on the user’s username.
The IOS allows you to create and use username/password pairs in your router configuration for
authentication purposes. Along with the authentication process, the user can be assigned as level
of privilege.
Examples:
In the example below, we have created three custom user levels using level numbers 2, 3, and 4.
Level 2 users can do show commands as well as all commands in levels below. By default, level
1 users can do most show commands. But after issuing the command privilege exec level 2
show in our configuration, it will no longer be possible. Level 3 users are permitted to issue the
command show ip route, but level 2 users cannot. Level 4 and above users can issue the show
access-list command as well as any command in levels below.
Router(config)# privilege exec level 2 show
Router(config)# privilege exec level 3 show ip route
Router(config)# privilege exec level 4 show access-list
The example below shows us assigning level 2 to any user that enters the router via telnet. It
assigns level 3 to any user that enters via the auxiliary port. And it assigns level 4 to anyone that
enters via the console port.
Router(config)# line vty 0 4
Router(config-line)# privilege level 2
Router(config-line)# line aux 0
Router(config-line)# privilege level 3
Router(config-line)# line console 0
Router(config-line)# privilege level 4
The example below creates a separate password for each custom level of privilege. If a user
issues the command enable 2, that user will be prompted for the password “twopass”. A level
three request will require the level three password and so on.
Router(config)# enable secret level 2 twopass
Router(config)# enable secret level 3 threepass
Router(config)# enable secret level 4 fourpass
The example below creates three users: bob, fred, and sam. Bos is a level 2 user. Fred is a level 3
user. Sam is a level 4 user. To have the router prompt for username and password when logging
in, use the command login local in your line configuration mode.
Router(config)# username bob privilege 2 password bobpass
Router(config)# username fred privilege 3 password fredpass
Router(config)# username sam privilege 4 password sampass
Router(config)# line vty 0 4
Router(config-line)# login local
Network Tools - Rediscover batch file.
Today I'd like to share with you some light ideas about network troubleshooting in Windows XP.
Most of your network connection issues can be fixed with an very enigmatic command called “Repair”. You can find this by clicking right mouse button on network icon at System Tray area. Please take a look on a picture below.

Before my explanation I’d like to remind you an old technique to create a DOS batch file. A DOS batch file is a list of commands grouped in one file with extension “.bat”. Usually you execute in a single DOS command in a command prompt. If you have to do a few of them at once you must do that one by one. Instead of this you can create a simple text file where you list commands to do. After finishing just rename your file for i.e. mycommand.txt to my command.bat.
Let’s take a look how we can fix our networking problem with a small DOS batch file. Below you see a list of prompt line commands.
@echo off
arp -d *
nbtstat -R
ipconfig /flushdns
nbtstat -RR
ipconfig /registerdns
So, fill your repair.txt with these commands and close with .bat extension like this example:

For explanation what individual command stands for please read this followed Microsoft Technet Library example:
ARP - displays and modifies entries in the Address Resolution Protocol (ARP) cache. The "–d *" switch deletes all entries of IP addresses.
NBTSTAT - displays NetBIOS over TCP/IP (NetBT) protocol statistics, NetBIOS name tables for both the local computer and remote computers, and the NetBIOS name cache.
The “-R” switch purges the contents of the NetBIOS name cache and then reloads entries from the Lmhosts file and “-RR” switch releases and then refreshes NetBIOS names for the local computer that is registered with WINS servers.
IPCONFIG - displays all current TCP/IP network configuration values and refreshes Dynamic Host Configuration Protocol (DHCP) and Domain Name System (DNS) settings. The “/flushdns” switch flushes and resets the contents of the DNS client resolver cache.
I hope today tip will be useful for you.
Happy learning :)
Get Command Prompt On Remote System

For those of you who know the power of the command line, you also know that it is really useful to be able to run some of these command line tools remotely. There are a number of different ways to do this. I would like to share with you a couple of my favorites.
PsExec
If you are not familiar with PsExec, then this is going to be a bit of a revelation for you. PsExec is a freeware program that allows you to execute a command on a remote machine. If that command is a command line program, it will send the output of that command back to you.The real trick comes when you run the command console. Try this command:
psexec \\RemoteComputer cmd.exe
What this does is connect to the remote computer and then open a command prompt on the remote machine. You can then work with this new command prompt and it will execute all of your actions on the remote system!
In order for this to work for you, you need to have the admin$ share active on the remote computer (which it is by default) and you need to have account information with administrative access to the system. This is mainly used in situations where you have a Windows network and you are the administrator of the network.
SSH on Windows
If you have the time to set up something a bit more elaborate, I would recommend using SSH on your computer. If you set it up properly, you can have remote command access to your computer just by having access to one port. This will then establish an encrypted command line session to the computer.
The other nice part of this is that you can get secure remote access to the computer running SSH from any computer on the Internet by simply forwarding one port on your external firewall to your internal system and pointing your SSH client to your firewall’s external IP address.
If you need a free SSH server for Windows, I would suggest freeSSHd. As for an SSH client, you can’t go wrong with PuTTY.
PsTools
The PSTools suite is one of those things that you’ll find new uses for every time you play with it. The PSTools suite was developed by Mark Russinovich who worked on the original NTFS file system, and hence has a rather unique insight into the inner workings of Windows systems.
The PSTools suite is comprised of the following utilities:
- PsExec – execute processes remotely
- PsFile – shows files opened remotely
- PsGetSid – display the SID of a computer or a user
- PsInfo – list information about a system
- PsKill – kill processes by name or process ID
- PsList – list detailed information about processes
- PsLoggedOn – see who’s logged on locally and via resource sharing (full source is included)
- PsLogList – dump event log records
- PsPasswd – changes account passwords
- PsService – view and control services
- PsShutdown – shuts down and optionally reboots a computer
- PsSuspend – suspends processes
- PsUptime – shows you how long a system has been running since its last reboot (PsUptime’s functionality has been incorporated into PsInfo)
Notice I said nothing but a default windows install. Microsoft has done something rather unique with the PSTools suite (in fact with the entire Sysinternals utilities collection), and made them usable from a “live” website (to get an overview of what is available, just type live.sysinternals.com\tools into your browser’s address bar).
Now all these tools are stand alone executables (no need to install), so they can be run from a USB drive (SWEET!!!), however being able to run them without even having the executables on the machine is just awesome!
::::Get it from here::::
Download PsTools Suite(1.31 MB)
Ping Multiple Servers At Once With Batch File.
A common tool that network and system admins make use of is the “Ping” command which is a very simple and effective way to verify a machine is available on the network (firewall rules depending of course). So if you find yourself having to ping multiple machines at once, a very useful tool is the batch files, which will not only ping all the ip addresses but also give you ping results in text file format with just single click.
A batch file is a text file containing a series of commands intended to be executed by the command interpreter. When a batch file is run, the shell program (usually COMMAND.COM or cmd.exe) reads the file and executes its commands, normally line-by-line. Batch files are useful for running a sequence of executables automatically and are often used by system administrators to automate tedious processes.
Steps to create batch file::
1. Open up Notepad, type in the following commands (Example)
@Echo off
ping 192.168.1.1 > "%userprofile%\desktop\mypings.txt"
ping www.google.com >> "%userprofile%\desktop\mypings.txt"
ping 192.168.1.222 >> "%userprofile%\desktop\mypings.txt"
Remember:: > will run the command and create a file with ping results and >> will append or add next ip address ping results to the created file . So whenever you create batch file first command should always have single > and subsequent commands should have >>.
2.Now save this file with Filename ping.bat or whatever you want and Change Save as type to All files.

3.Run the ping.bat and you will get mypings.txt on your desktop.
If you want to place results text file someplace else, Say on C: drive just type c:\mypings.txt after >.
Example::
ping 192.168.1.1 > c:\mypings.txt
ping www.google.com >>c:\mypings.txt
Play around with netstat , ipconfig and other commands by creating batch files in the similar manner.., just change the ping command to the command of your choice in the above example.
happy learning :)
Spiceworks Desktop 4.6
Will organize and monitor software, hardware, and patches on your network.

Inventory Everything on Your Network:
· Discover the Windows, Mac, and Linux PCs and servers, routers, printers and any other IP-based devices on your network.
· Gather all of their relevant technical data plus the software, patches and services on each machine.
· Add important data such as the number of licenses you have, the purchase price and physical location.
· Keep track of other assets such as mobile phones and even office furniture. All without agents.
· Store all inventory information locally and securely on your network - so there's no concern about sensitive data flying across the Internet.
Run an IT Helpdesk:
· Create a ticket in one click if you discover an asset that requires your attention while browsing your network in Spiceworks.
· Let your clients submit tickets with attachments to you via email or the Web and then allow them to view the status of those tickets online.
· Assign tickets across your IT team, attach them to hardware on your network, and manage your projects.
· Easily run reports on your tickets so you can see things like due dates and which assets (or even departments!) cause you the most issues.
Monitor Your Network for Trouble:
· See and set up alerts for Windows events that occur across your environment - so you can easily detect, diagnose and troubleshoot issues that disrupt your network.
· Automatically identify PCs and servers with low disk space, the presence of unwanted software on your network, the status of your anti-virus updates, printers with low toner and ink levels, and offline servers.
· Receive email alerts about potential issues.
· View all the monitors you care most about in one centralized spot.
Report on Your Network:
· With one-click, see software installed on your machines, disk usage across the network, trouble tickets you've created in the past month, and much more.
· Create the custom reports you need with a simple interface.
· Publish reports so others in your company can stay in the loop.
· Export any report to PDF and Excel.
· Exchange useful report templates with other Spiceworks users.
Troubleshoot Issues on Your Network:
· See what software is on a machine that is causing it to run slowly.
· Launch your remote control tool from within Spiceworks.
· Compare two machines to see what settings are different.
· Ping machines to see if they are online.
· See traceroutes to identify the flow of data.
· Identify when a server is running out of capacity.
Step by Step Cisco Router Local Password Recovery
Theres no real intro needed to this tutorial. This is literally going to be a step by step, just
as the title suggests. However, before I go on, I think it important to know WHY and HOW
this works as well as it can be applied somewhat to other devices/situations.
Cisco routers work like this:
ROM > NVRAM > FLASH > DRAM
lets break it down:
ROM:
This is your Basic IOS. (thats Internetworking Operating System for those who dont know)
Think of it kind of like CMOS with the exception that you cannot flash or alter it. The ROM
contains the /BOOTP as well.
The Bootp has a value which defines how the device will boot.
They are as follows:
0x2102 <-- normal boot sequence
0x2142 <-- skips NVRAM
0x2101 <-- skips FLASH
0x2000 <-- diagnostic mode
NVRAM:
Non Volatile RAM. This is like a hard drive being that the memory is non-volatile meaning
that the info in it stays after a reboot. This contains the startup-config which contains the
PWs to the device.
FLASH:
This is your IOS.
DRAM:
Think of this as RAM, because thats what it is. Its volatile memory that contains the
running-config. Any changes you make to the system are saved to the running config but
being its volatile, once the system is rebooted for whatever reason, those changes are gone.
This is why you "copy run start" to save the changes in the running config to the startup
config so that they are applied if/when the device is rebooted.
(pardon the abbreviation of the commands, but as anyone thats used Ciscos IOS knows,
you can abbreviate any command or subcommand pretty well, so no need to write it all out.
"cop ru st" will so the same thing as "copy run start". Blah blah blah, you get the idea, no
need to get into this now.)
Moving on.
Now that Ive explained all that and you hopefully have an understanding of how the
devices boot sequence works, on to the password recovery.
1. Reboot the device.
2. press control + break within 60 seconds of the reboot.
this brings you to the basic IOS.
Now you can change the value in the BOOTP from 0x2102 to 0x2142, which skips
NVRAM, which contans the startup-config, which contains the password.
3. Reset.
Ok, so now that this point the device will boot up and due to the change in the bootp will
bypass the NVRAM and bring you into the IOS.
4. At the prompt:
Router> enable
Router# copy start run
ROUTERNAME#config t
here is where you either view or change the password. You may be able to view it if the
administrator hasnt encrypted it. If thay have, you can crack it or easier still just assign a
new one.
ROUTERNAME(config)#config 0x2102
this changes the boot sequence back to normal.
ROUTERNAME#copy run start
This copies the DRAM to the NVRAM... thus saving the changes you made.
5. Reboot.
Done. The device will then reboot and prompt you for the password that you just set. Enter
it and its all good.
Hope you enjoyed this tutorial.
The OSI Layers
Background Information
The OSI architecture was set up by the ISO (International Standards
Organization) as the first formally defined way of connecting computers. The
OSI architecture divides network functionality up into seven layers, where
various protocols implement the functionality assigned to a given layer.
The Layers
The Physical Layer
This is the first layer of standards. It’s a set of rules regarding the hardware
used to transmit data. Among items covered at this layer are the voltages
used, the timings of transmission, and the rules used for the initial
handshaking connection.
The Data Link Layer
The physical layer provides the data link layer with bits. Now this layer
provides the bits with some meaning. We no longer deal with bits but
instead with data frames - packets, containing data as well as control
information. The data link layer adds flags to indicate the start and end of
messages.
This layer’s standards perform two important tasks. It ensures that data is
not mistaken for flags, and that it checks for errors within the frame.
The Network Layer
The network layer, is concerned with packet switching. It establishes virtual
circuits (Paths between terminals) for data communications. As the sending
end, the network layer repackages messages from the transport layer above
it into data packets, so the lower layers can transmit them.
The Transport Layer
The transport layer of the OSI model has many functions, including several
order f error recognitions and recoveries. As the highest order, the Transport
layer can detect errors, identify packets that have been sent in the incorrect
order, and then rearrange them. The transport layer also regulates the
information flow by controlling the messages movements.
The Session Layer
The session layer is concerned with the management of the network. The
user communicates directly with this layer. It can verify passwords entered
by the user. It can determine who uses the network, for how long, and for
what purpose. It controls data transfers and even handles recovery from
system crashes.
The Presentation Layer
This layer is concerned with the network security, file transfers and
formatting functions. At the bit level it is capable of encoding data in a
variety of different forms including ASCII and EBCDIC.
For true Communication, both communicating computers must contain the
same protocols. This level handles protocol conversions between different
computers using different formats.
The Application layer
The application layer handles messages, remote logons and the
responsibility of network management statistics. At this level are the
database management programs, electronic mail, file server and printer
server programs. The operating systems command and response language.
OSI Vs TCP/IP
Unfortunately (for the many people and companies that spent so much time
and money on the effort), the TCP/IP suite of protocols has eclipsed OSI,
and you don't hear much about OSI anymore (except for a few applications,
such as the X.500 directory service).
When work began (in the late 1970s) on providing a standard method for
communications between different hardware platforms, TCP/IP was not
considered an option for serious commercial applications, since TCP/IP:
Required you to run UNIX (which, at the time, was not used for commercial
applications and had only a command-line user interface)
Had poor security and management features
Had too small an address size
Therefore the ISO promoted development of OSI.
Although all major (and many minor) computer vendors now have OSI
products, the OSI protocols were never widely implemented, and TCP/IP has
become the first choice for multi-vendor networking, because of its:
Lower-cost and more-efficient implementation (less CPU time required,
smaller programs)
Availability for most operating systems
Fast standardization and development cycle (usually using the Internet to
facilitate communications) when a new requirement is identified
Familiarity among college graduates (universities use TCP/IP, so once out of
school, a graduate's first choice when designing a system is to use TCP/IP)
Easier-to-access (and zero-cost) documentation and standards (they are all
available on the Internet)

Cisco IOS lab activities videos.

ftp://89.38.172.126/Downloads/Filmulete/cisco%20curs/flash/activities/
Happy Learning :)

Frame Relay Configuration
1. Configuration Manual Resolution:

R1>enable
R1#configure terminal
R1(config)#interface serial 1/0
R1(config-if)#ip address 192.168.1.1 255.255.255.0
R1(config-if)#encapsulation frame-relay
R1(config-if)#frame-relay lmi-type ansi
R1(config-if)#frame-relay map ip 192.168.1.2 100
R1(config-if)#no shutdown
R2>enable
R2#configure terminal
R2(config)#interface serial 1/0
R2(config-if)#ip address 192.168.1.2 255.255.255.0
R2(config-if)#encapsulation frame-relay
R2(config-if)#frame-relay lmi-type cisco
R2(config-if)#frame-relay map ip 192.168.1.1 200
R2(config-if)#no shutdown
1. Configuration Dynamic Resolution:
R1>enable
R1#configure terminal
R1(config)#interface serial 1/0
R1(config-if)#ip address 192.168.1.1 255.255.255.0
R1(config-if)#encapsulation frame-relay ietf
R1(config-if)#no shutdown
R2>enable
R2#configure terminal
R2(config)#interface serial 1/0
R2(config-if)#ip address 192.168.1.2 255.255.255.0
R2(config-if)#encapsulation frame-relay ietf
R2(config-if)#no shutdown
Frame-relay Non-broadcast multiple access configuration (NBMA):

R1>enable
R1#configure terminal
R1(config)#interface serial 1/0
R1(config-if)#ip add 192.168.1.1 255.255.255.0
R1(config-if)#encapsulation frame-relay
R1(config-if)#frame-relay map ip 192.168.1.2 100
R1(config-if)#frame-relay map ip 192.168.1.3 101
R1(config-if)#no shutdown
R1(config-if)#end
R2>enable
R2#configure terminal
R2(config)#interface serial 1/0
R2(config-if)#ip add 192.168.1.2 255.255.255.0
R2(config-if)#encapsulation frame-relay
R2(config-if)#frame-relay map ip 192.168.1.1 200
R2(config-if)#frame-relay map ip 192.168.1.3 200
R2(config-if)#no shutdown
R2(config-if)#end
R3>enable
R3#configure terminal
R3(config)#interface serial 1/0
R3(config-if)#ip add 192.168.1.3 255.255.255.0
R3(config-if)#encapsulation frame-relay
R3(config-if)#frame-relay map ip 192.168.1.1 300
R3(config-if)#frame-relay map ip 192.168.1.2 300
R3(config-if)#no shutdown
R3(config-if)#end
Frame-relay point-to-point configuration

R1>enable
R1#configure terminal
R1(config)#interface serial 1/0
R1(config-if)#no ip address
R1(config-if)#encapsulation frame-relay
R1(config-if)#no shutdown
R1(config-if)#exit
R1(config)#interface serial 1/0.100 point-to-point
R1(config-subif)#ip add 192.168.1.1 255.255.255.0
R1(config-subif)#frame-relay interface-dlci 100
R1(config-subif)#exit
R1(config)#interface serial 1/0.101 point-to-point
R1(config-subif)#ip add 192.168.2.1 255.255.255.0
R1(config-subif)#frame-relay interface-dlci 101
R2>enable
R2#configure terminal
R2(config)#interface serial 1/0
R2(config-if)#ip add 192.168.1.2 255.255.255.0
R2(config-if)#encapsulation frame-relay
R2(config-if)#frame-relay interface-dlci 200
R2(config-if)#no shutdown
R2(config-if)#end
R3>enable
R3#configure terminal
R3(config)#interface serial 1/0
R3(config-if)#ip add 192.168.2.2 255.255.255.0
R3(config-if)#encapsulation frame-relay
R3(config-if)#frame-relay interface-dlci 300
R3(config-if)#no shutdown
R3(config-if)#end
Frame-relay multi point configuration:

R1>enable
R1#configure terminal
R1(config)#interface serial 1/0
R1(config-if)#no ip address
R1(config-if)#encapsulation frame-relay
R1(config-if)#no shutdown
R1(config-if)#exit
R1(config)#interface serial 1/0.100 multipoint
R1(config-subif)#ip add 192.168.1.1 255.255.255.0
R1(config-subif)#frame-relay interface-dlci 100
R1(config-subif)#frame-relay interface-dlci 101
R1(config-subif)#exit
R2>enable
R2#configure terminal
R2(config)#interface serial 1/0
R2(config-if)#ip add 192.168.1.2 255.255.255.0
R2(config-if)#encapsulation frame-relay
R2(config-if)#frame-relay interface-dlci 200
R2(config-if)#no shutdown
R2(config-if)#end
R3>enable
R3#configure terminal
R3(config)#interface serial 1/0
R3(config-if)#ip add 192.168.1.3 255.255.255.0
R3(config-if)#encapsulation frame-relay
R3(config-if)#frame-relay interface-dlci 300
R3(config-if)#no shutdown
R3(config-if)#end
Common Network Troubleshooting
Note: This article is geared towards “power users” of Windows, and if you are confused on something mentioned here, look it up on Google or find more information about it other wise. Anyway, this is a guide to some REAL network troubleshooting issues that truly occur on a day-to-day basis. Whenever I had these problems, I was never able to find them in any network “troubleshooting” guides on the Internet. Instead, I had to figure these out by long searching or trial and error. Here are some fixes to common problems:
Problem: I cannot see people on my network using “My Network Places” or “Network Neighborhood” and they cannot see me, yet I can use the Internet!
Solution: You are probably on a different subnet than the others. Open up your TCP/IP configuration in Windows and change your subnet mask to whatever the other people are.
Problem: I have rejoined another workgroup; yet, both the new one and the old one show up in “My Network Places” or “Network Neighborhood.”
Solution: Give it about 30 minutes. The Windows browser service is screwed up.
Problem: I cannot access the Internet but my friends can!
Solution: Make sure that you have the same TCP/IP settings as the rest of the people (except for IP address – make sure it is unique). If the other people obtain their IP’s automatically, do the same for your computer. Then, open a command prompt [Start->Run->Cmd] and type in ping www.google.com. If it says “Request Timed Out.” then you still cannot connect to the Internet. So, we will continue. See if you have the Internet Connection Firewall enabled. If so, disable it and try again. If it still doesn’t work, check to see if your cables are snug in both ends and to see if both the hub/switch/router and your network adapter are both blinking. Next, go back to command prompt and type in ipconfig /release. Wait a bit, then type ipconfig /renew. If you do all this and your Internet still does not work, then restart your computer and pray.
Problem: I cannot host a game over the Internet.
Solution: Usually has something to do with routers. Find out which port(s) that your game uses. Then, in your router configuration (usually located at 192.168.0.1 or 192.168.1.1 or 192.168.254.254), go to the “Port Forwarding” section. Forward requests from the port(s) needed by your game to your computer’s ip address (you can find it by typing in ipconfig /all or winipcfg). Then, you are set!
Problem: I cannot join a domain from a computer that is otherwise perfectly configured for networking.
Solution: The most likely reason for this occurring is that your domain requires an Administrator’s login and password to confirm a computer joining a domain. When the box comes up that requests a username/password for your domain have your domain admin type in his or her password. The computer will then require a restart, and when it has restarted, you will be able to login to your domain with your own username and password. Don’t forget to update your user settings on your own computer!
Problem: I cannot ping localhost or 127.0.0.1
Solution: TCP/IP is not installed. Install it using the Network Connections properties configuration screen.
Problem: When I plug in a network cable into my NIC, the “Link” light does not light up like it should be doing.
Solution: This could be due to three problems. I will list them in the “most likely” order they would occur:
- The “other end” of the cable leads to nowhere, or is not connected to any powered network device.
- Your NIC is not properly inserted in your motherboard.
- The cable is bad.
The fixes for these problems are self-explanatory.
Problem: Occasionally, my computer will bring up a dialogue box that says something like “System Shutdown In Progress: Shutdown initiated by my computer\SYSTEM” and the computer is forced to shutdown. How do I stop it?
Solution: This dialogue box usually comes up when the RPC server on your computer is shutdown or crashes. The most likely cause of the error is that you accidentally closed down a “svchost.exe” process in Task Manager that happened to be the RPC Server. The second most likely cause is that you are under attack and you should immediately shutdown your computer.
Problem: I keep getting an “IP Address Conflict” error at the bottom of my screen.
Solution: Someone on your network is using (or trying to use) the same IP address as you are. If you manually assign IP’s, then choose a different one either for yourself or for the other person. If you use DHCP or APIPA, type in the command prompt: “ipconfig /release” and then “ipconfig /renew”
Problem: I have a “10/100″ network adapter (NIC), yet my connection speed is only 10 MB/S.
Solution: Well, there are a few causes and therefore a few solutions. They are ordered from most to least likely.
- Your Ethernet hub does not support 100 MB/S. Buy a hub that does.
- Your adapter is improperly configured. Go to your Adapter settings and change it to “Auto-Negotiation.”
- There is a bottleneck in your network. If you are trying to connect over a WAN (such as the Internet) realize that you will never achieve full 100 MB/S or even 10 MB/S for that matter. Run tracert to find bottlenecks, and then consider an alternate route or a different routing protocol (if the option is available).
- The end that you are communicating with does not have a 10/100 NIC. Buy the other computer a 10/100 MB/S. card.
Easily Ping Multiple Servers At Once

A common tool that network and system admins make use of is the “ping” command which is a very simple and effective way to verify a machine is available on the network (firewall rules depending of course). So if you find yourself having to ping multiple machines at once, a very useful tool is Nirsoft’s PingInfoView.
PingInfoView is a small utility that allows you to easily ping multiple host names and IP addresses, and watch the result in one table. It automatically ping to all hosts every number of seconds that you specify, and displays the number of succeed and failed pings, as well as the average ping time. You can also save the ping result into text/html/xml file, or copy it to the clipboard.The usage of this tool is self-explanatory, but the functionality is very practical as you can visually see which servers are and are not responding. If you manage multiple servers then this tool sure beats manually pinging each one.
Using PingInfoView
PingInfoView doesn't require any installation process or additional dll files. In order to start using it, simply run the executable file (PingInfoView.exe), type the host names and IP addresses that you want to ping, and click the 'Ok' button to start pinging.Use IP-Host Description format
When this option is selected, you should specify the IP addresses list in the following format:192.168.1.10 Main Server 192.168.1.11 Host 01 192.168.1.12 Host 02The description of each IP address is automatically added to the description column.
Command-Line Options
| /loadfile | Load the specified filename that contains host names and/or IP addresses. |
| /PingTimeout | Specifies the ping timeout value, in ms. |
| /PingEvery <0 | 1> | Specifies whether to ping every xx seconds (0 - No, 1 - Yes) |
| /PingEverySeconds | Specifies the number of seconds to wait between the pings. |
| /IPHostDescFormat <0 | 1> | Specifies whether to use the IP-Host Description mode (0 - No, 1 - Yes) |
System Requirements
This utility works under Windows 2000, Windows XP, Windows 2003 Server, Windows Vista and Windows 7. Older versions of Windows are not supported.Get it From here ::::
http://www.nirsoft.net/utils/pinginfoview.zip
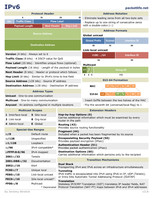
IPv6 - Introduction

Description of IPv6 Packet Header
Hexadecimal "Hex"

Addressing Description
Broadcasting Methods
![]() Unicast
Unicast![]() Multicast
Multicast![]() Anycast
AnycastUnicast
a unicast address are delivered to the interface identified by that address, as seen in
Figure 32-3.

Multicast

Anycast

Summary
Review Questions
CCNA Video Zone
Checkout new CCNA Video Zone under Pages , will be adding some more videos soon ...
Happy learning :)
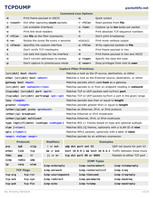
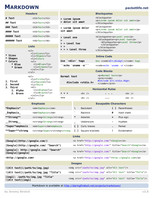
Cheat Sheets
Click on Image to Download Pdf file
Protocols
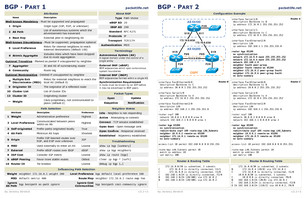
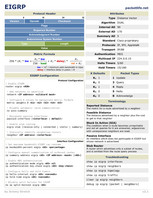
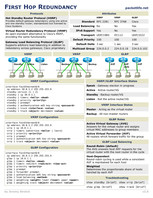
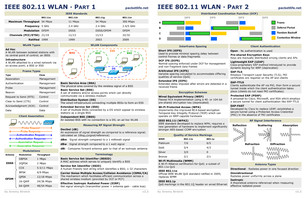
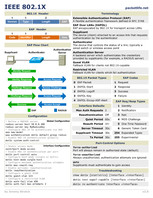
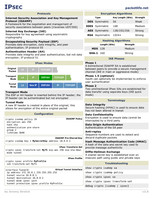
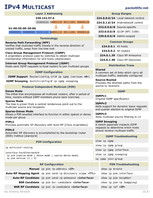
Applications
Reference


Syntax
Technologies

Voice
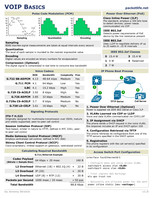
Miscellaneous
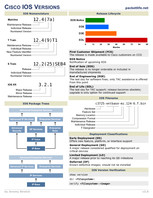
Physical Terminations

Source:::: http://packetlife.net/library/cheat-sheets/
CCNA LAB ACTIVITIES+LAB MANUALS (Packet Tracer v5.3 Application + Tutorial)
I have uploaded Packet Tracer 5 lab activites for CCNA 640-802 as well as Cisco Networking Academy Student Lab Manuals of Routing Protocol and Concepts and Lan Switching and Wireless.


CCNA LAB ACTIVITIES+LAB MANUALS 18mb

http://www.mediafire.com/?1se4f6p84dcfkgj
Packet Tracer v5.3 Application + Tutorial | 73.9MB

Packet Tracer Version 5.3 Software Downloads
Packet Tracer version 5.3 is a minor release that includes new protocol support and enhanced functionality: It replaces Packet Tracer version 5.2.1.8
Packet Tracer 5.3 supports activities authored in Packet Tracer 4.0, 4.1, 4.11, 5.0, 5.1 and 5.2.x . Please note that the last two courses of the CCNA Discovery and CCNA Exploration curricula require Packet Tracer version 4.11 at a minimum, CCNA Security requires version 5.2 at a minimum, and the beta Packet Tracer Skills Based Assessments require version 5.2.1 at a minimum. The curricula are fully compatible with Packet Tracer 5.3
You can download both the Packet Tracer application and tutorial files in one download package. However, due to the large file size it is faster to download the application by itself, if that is all you need. Choose the download option appropriate for your needs.
http://rapidshare.com/files/396002499/PacketTracer5.3_Team-ND.rar
or
http://hotfile.com/dl/46822557/61763ae/PacketTracer5.3_Team-ND.rar.html
or
http://www.fileserve.com/file/RJmbsmH/PacketTracer5.3_Team-ND.rar
 Previous Article


