
How to use VPCS with GNS3 in Ubuntu.
1.Download vpcs from here VPCS 0.20a
2.Extract and look for vpcs32.linux(for 32-bit systems) and vpcs64.linux (for 64-bit systems)
3.Fire up the Terminal and issue following command
chmod +x vpcs32.linux
4.Then we'll open and configure startup.vpc in gedit
gedit startup.vpc

5.Now configure startup.vpc according to your requirement. For example I'll add just two hosts for this tutorial.
Host 1 (VPCS1) with Ip 192.168.1.10/24 and 192.168.1.99 as its gateway.
Host 2 (VPCS2) with Ip 192.168.1.11/24 and 192.168.1.99 as its gateway.
** add # to the rest of the lines.
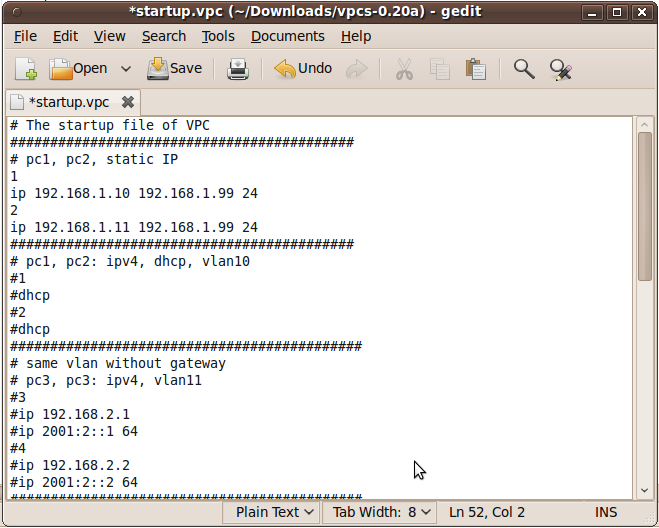
6.Now lets start VPCS by issuing the following command within the terminal.
./vpcs32.linux
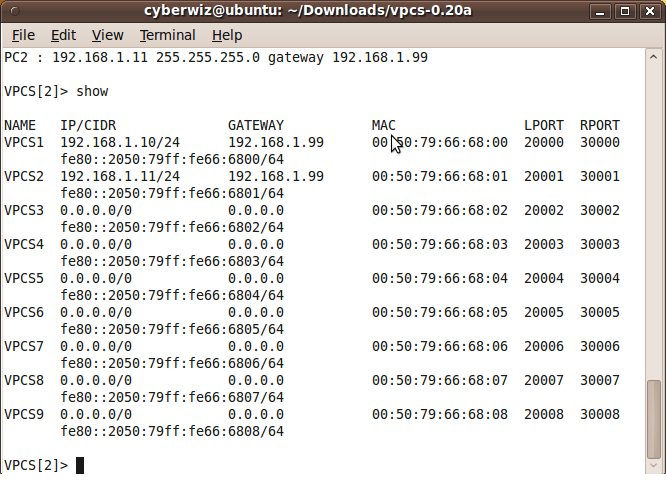
7.Use show command to see all the configured ip addresses.
Fire up GNS3 (run gns3 as a root).
9.This is a optional step where I'll be adding symbols to PC hosts.

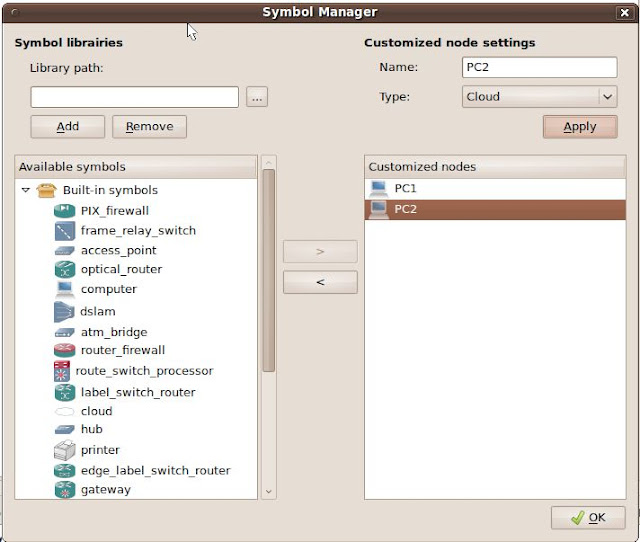
10.Add computer symbol from 'available symbol' to 'customized nodes'
on name = anyname ie, PC1
on type = Cloud
click ok
Do the same for PC2
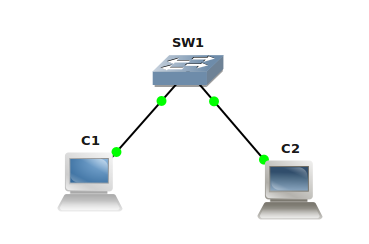
11.Drag and Drop PC1 and PC2 into the GNS3 Workboard.
Double click on PC1
click on 'C1'
go to tab 'NIO UDP'
hold....
go back to Step 7
Check the LPORT and RPORT
12.On Local port add rport value
on Remote port add lport value
on Remote host add 127.0.0.1
click add
Do the same for PC2 (again check the respective ports)

14. Maximize vpcs window and lets ping to each host to check the connectivity between them.
To navigate from 1 pc to another, simply type the number

As you see, a successful connectivity has been established between the two hosts.
Happy Learning :)
 Read More
10
comments
Read More
10
comments
Add GUI QEMU Host in GNS3
Today I’ll show you how to add graphical host in GNS3 using Qemu. We’ll be using tinycore which is based on Linux 2.6 kernel, Busybox, Tiny X, and Fltk. Tiny Core includes ssh, iptables, iproute, tcpdump and IPv6 support. It is quite well integrated and doesn't require much tuning. This is a graphical version of Microcore linux image, we used in previous tutorial Add Qemu host in GNS3 .
Setup image for Qemu host

- Identifier: tiny_core
- image: local path to linux-tinycore-2.11.5.img
- Memory: 64 MB
- NIC: e1000
- Qemu options: -no-acpi
Press Save and just added image will appear into Qemu Host images list.
Drag Host >> Select Name >> Right Click >> Start

Happy Learning
 Read More
8
comments
Read More
8
comments
How to run Linux Router Vyatta in GNS3
What is the Vyatta ?
Vyatta is bringing innovation and affordability to the networking industry by delivering advanced routing and security in a software-based network OS that scales from the branch office to the service provider edge. Vyatta has decoupled networking software from proprietary hardware allowing users to leverage the price and performance advantages of standard x86-based hardware and components as well as Citrix XenServer and VMWare virtual or cloud environments.http://www.vyatta.com/
In this tutorial brezular shows us how to install Vyatta 6.1 Core LiveCD on Qemu image and run it from GNS3.
1. Download Vyatta Core 6.1 LiveCD iso (You need to fill short questionnaire for Vyatta download)
Vyatta download http://www.vyatta.com/downloads/index.php
2. Create Qemu qcow2 image
/usr/local/bin/qemu-img create -f qcow2 ./vyatta6.1vc.img 1G
3. Boot Qemu image with Vyatta 6.1 LiveCD
/usr/local/bin/qemu -boot d -hda ./vyatta6.1vc.img -cdrom ./vyatta-livecd_VC6.1-2010.08.20_i386.iso -m 512
login/password: vyatta/vyatta
4. Install Live CD
To install Live CD to Qemu image enter this command (as user vyatta)
install-system
The tutorial is opened and it walk you through installation process:
Would you like to continue? (Yes/No) [YES]: Enter
Partition (Auto/Union/Parted/Skip) [Auto]: Enter
Install the image on? [sda]: Enter
This will destroy all data on /dev/sda.
Continue? (Yes/No) [No]: Yes
How big of root partition should I create? (1000MB – 1074MB) [1074]MB: Enter
I found the following configuration files
/opt/vyatta/etc/config/config.boot
Which one should I copy to sda? [/opt/vyatta/etc/config/config.boot] Enter
Enter password for administrator account
Enter vyatta password: your_password
Retype vyatta password: your_password
Which drive should GRUB modify the boot partition on? [sda]: Enter
Done!
Now you successfully install Vyatta.
5. Adapt Vyatta NIC behavior to GNS3 Qemuwrapper
GNS3 qemuwrapper always changes MAC address of presented NIC during the boot of Qemu instance. Vyatta is programmed to save MAC address of existing ethernet interfaces. If MAC address of particular NIC is changed (by GNS3 qemuwrapper) Vyatta preserves the interface with old MAC and create new interface with new MAC.
Each time Qemu instace is restarted the number of interfaces doubled.
These are my steps how to solve it (it must be a better solution but I didn’t find any with Google search):
a) Enable root account on Vyatta 6.1
thank to Tim Peerlings blog http://www.timpeerlings.nl/enable-root-account-on-vyatta-6-1/
vyatta$ configure
vyatta#set system login user root authentication plaintext-password test
vayata# commit
vyatta# save
exit
Now you should switch to user root:
su
Password: test
b) Remove vyatta_net_name script (root account needed)
cd /lib/udev/
mv ./vyatta_net_name ./vyatta_net_name_backup
rm ./vyatta_net_name
6. Setup serial console login
thanks to Petr’s blog http://linux.xvx.cz/2009/08/debian-with-grub2-and-serial-connection/
This configuration redirects output to serial ttyS0 and allows you to use Console in GNS3.
Login as root with su command and modify grub configuration file:
vim /etc/default/grub
Change the lines in configuration file according to these lines
# This file is sourced by update-grub, and its variables are propagated
# to its children in /etc/grub.d/
GRUB_DEFAULT=0
GRUB_TIMEOUT=0
GRUB_DISTRIBUTOR=`lsb_release -i -s 2> /dev/null || echo Debian`
GRUB_CMDLINE_LINUX_DEFAULT=”console=tty0 console=ttyS0,9600n8″
# Uncomment to disable graphical terminal (grub-pc only)
GRUB_TERMINAL=serial
GRUB_SERIAL_COMMAND=”serial –speed=9600 –unit=0 –word=8 –parity=no –stop=1″
# Uncomment if you don’t want GRUB to pass “root=UUID=xxx” parameter to LinuxNow update grub with command:
#GRUB_DISABLE_LINUX_UUID=true
update-grub
7. Setup GNS3 for Vyatta qemu image
- Start GNS3
- Edit-> Preferences-> Qemu-> Qemu Host
Set your settings according to picture:

Check Kvm option only if your processor supports hardware virtualization. Check Kqemu option only if it is installed and running. If you are not sure with these options let them unchecked otherwise Qemu will be not started.
You need also set Qemu general settings like path to qemu, qemu-img and qemuwrapper.
- Edit-> Preferences-> Qemu-> General Settings
Check the picture for details:

Login to Vyatta:
login/password: vyatta/your_password
8. Conclusion
Brezular has made a video to prove functionality of Yvatta Qemu image. In this video three Vyatta Qemu instances run RIP routing protocol.
Video: RIP configuration on Vyatta box:
http://rapidshare.com/files/419301470/vyatta_on_qemu_gns3.rar.html
You can download Vyatta 6.1 Qemu image from here:
http://rapidshare.com/files/420013925/vyatta6.1vc.part1.rar
http://rapidshare.com/files/420013926/vyatta6.1vc.part2.rar
login/pass: vyatta/skuska
root account: root/skuska (Don’t use root account for router configuration)
If you use Linux and there is already non-patched Qemu installed in your distro don’t forget to patch, compile and install Qemu for udp tunnels and multicast. The great How to is here:
http://blog.gns3.net/2009/10/olive-juniper/2/
Special Thanks to Brezular for this great tutorial.
Read More
0
comments
All About GNS3
You can find some user based support on the Freenode network of IRC.
Server: irc.freenode.com
Channels:
#gns3: Focuses on support for the GNS3 product (bugs, recommendations, complaints)
#gns3-labs: Aimed to help with labs and trade topologies.. Not an official GNS3 support channel.
Dynamips Tutorial: Dynagen is a front-end for use with the Dynamips Cisco router emulator
7200emu.hacki.at: A forum for everything GNS3, Dynamips, Dynagen and overall help.
BlindHog.net: Great website with videos, configs and files on setting up working labs with some troubleshooting and testing exercises.
BrainBump: This website is dedicated for helping those who are working towards achieving their CCIE.Personally, The author is working towards CCIE voice and this blog will help those who are pursuing Voice/Security/RS CCIE’s.
- Need help installing GNS3 on Windows XP?
- A new tutorial for GNS3 0.5 is available here (highly recommended for beginners). OUTDATED
- Need help installing GNS3 on a Linux platform?
-
Video tutorials
Beginners
- Internet LAB Tutorial Part 2
- Installation Tutorial for Linux
- How to build an Internet Lab
- GNS3 Graphical router emulation software
- Switching lab Part 2 (router on a stick)
-
Switching
- How to build a switching lab Part 1
- How to install and enable ASDM (PIX firewall) using GNS3
- How to configure IOS IPS (Intrusion Prevention System) using SDM in GNS3
- How to use Pemu as your personal firewall
- How to communicate with Pemu
- Pemu PIX emulator with GNS3
-
Voice
- How to build a voice lab with GNS3 and VMWare
- How to use a third party SIP phone with Cisco routers using GNS3
- How to setup Call Manager Express (CME) router using GNS3
- How to configure Cisco Unified Call Manager Express GUI using GNS3
- How to configure Cisco Unified Call Manager Express (CUCME) router for XML Services
- How to register third party SIP phone to Cisco Unified Call Manager Express (CUCME)
- How to setup CME SIP trunk to VoIP SIP Service Provider Part 1
- How to save labs with router configs
- How to build a frame-relay lab
- How to integrate a Microsoft Loopback interface with GNS3
- How to use Putty for console access
- How to use Putty Connection Manager for console access
-
Misc
- How to setup and install Cisco Security Device Manager (SDM) on router using GNS3
- How to setup and configure Cisco Configuration Professional (CCP)
- How to lockdown Cisco Router’s Configuration Access
- How to configure and setup IPv6 connectivity between Windows XP and Cisco Router
- How to run multi-pc topology using distributed hypervisors in GNS3
Read More
0
comments
Configure Vmware to work with GNS3.
These are links to videos created by Timw of hacki.at. Timw is a helpful guy on the forums over there and took time to create some videos on configuring VMWare to work with Dynamips/Dynagen & GNS3. In one of the Videos he also teaches you how to setup a simple frame-relay lab.
Video 1: VMWare Server Network Setup
Setting up a virtual network in VMWare Server for use with Dynamips, Dynagen and GNS3
http://www.4shared.com/file/40989090/6e056245/VMWare_Server_Network_Setup.html
Video 2: Frame Relay
How to use GNS3 to setup a Frame relay network using 2 routers and 2 virtual machines running in VMWare Server on a local work station.
http://www.4shared.com/file/40874613/803e59ec/Frame_Relay.html
Video 3: VMWare Server Network Setup 2
Shows how to create a virtual network adapter and then connect it to a Virtual machine using VMWare Server. After that it shows how to connect the Network Adapter to a cloud in GNS3.
http://www.4shared.com/file/41078214/19a152f2/VMWare_Server_Network_Setup2.html
Video 4: Saving Configs in GNS3
How to save your router configs in GNS3.
http://www.4shared.com/file/50577485/d99a2f50/GNS3_Save_Configs.html
Labs & videos created by Timw @ 7200emu.hacki.at
Read More
1 comments
How to Install Gns3 on Mac Os X
Here are instructions to install GNS3 from the sources on Mac os X. You will have to install or compile dependencies like Qt, Sip and PyQt. This will allow you to use the latest development version of GNS3 that you can download from http://code.gns3.net.
Method 1
- Install the Apple Devs Tools (on your Mac OS X DVD or download it on ADC account). Run and install XcodeTools.mpkg.
- Download Python 2.6 for MacOS X and install it.
- Download Qt libraries for Mac and install them.
- Download SIP, open a terminal and go in the folder where you downloaded the tar file and compile using the following commands (example for SIP 4.9.3):
Macintosh:$  tar xvzf sip-4.9.3.tar.gz
Macintosh:$  cd sip-4.9.3
Macintosh:sip-4.9.3$  python configure.py
Macintosh:sip-4.9.3$  make
Macintosh:sip-4.9.3$  make install
- Download PyQt and run the following commands to decompress and compile PyQt (example for PyQt 4.6.2):
Macintosh:$  tar xvzf PyQt-mac-gpl-4.6.2.tar.gz
Macintosh:$  cd PyQt-mac-gpl-4.6.2
Macintosh:PyQt-mac-gpl-4.6.2$  python configure.py
Macintosh:PyQt-mac-gpl-4.6.2$  make
Macintosh:PyQt-mac-gpl-4.6.2$  make install
- Download GNS3 source from here or the development version and start the script named gns3.
Method 2
This method can take a few hours as everything is compiled but this is the most flexible as you can switch between dependencies versions very easily.
- Download and install Mac Ports (you will need the Apple Devs Tools).
- Open a terminal and install GNS3 dependencies.
Macintosh:$ sudo port install python26
Macintosh:$ sudo port install python_select
Macintosh:$ sudo python_select python26
Macintosh:$ sudo port install py26-sip
Macintosh:$ sudo port install py26-pyqt4
Macintosh:$ sudo port install qt4-mac
- Download GNS3 source from here or the development version and start the script named gns3.
Notes about Mac Ports
Optionally, to prevent Mac Ports to install the last version of the dependencies (which may not work properly with GNS3), you can force a specified version with @.
Example:
Macintosh:$ sudo port install py26-sip @4.9.3_0
Macintosh:$ sudo port install py26-pyqt4 @4.6.2_0
Macintosh:$ sudo port install qt4-mac @4.5.3_0
Also, let say you have installed the latest version of Qt but this one doesn’t work very well with GNS3, you can revert back to your previous Qt version using the command sudo port activate qt4-mac @version_number. This will automatically deactivate the current version of Qt and activate the one you want.
Read More
0
comments
Add Qemu Host in GNS3.

By: Jaakko Rautanen
13.8.2010
v1.1
Version history of this document:
| v1.1 | Added instructions for console connection |
| v1.0 | Published |
Overview
Qemu image of Microcore Linux 2.10, is small linux image ready to be used in GNS3 and which includes ssh, iptables, iproute, tcpdump and IPv6 support. It is quite well integrated and doesn't require much tuning.
Download Microcore Linux Qemu image
Microcore Linux 2.10 image can be downloaded separately from GNS3 web site.
Setup image for Qemu host
- Go to Edit | Preferences | Qemu | Qemu Host
- Setup new image with following properties
Identifier: MicrocoreBinary image: local path to linux-microcore-2.10.imgMemory: 64 MBNIC: e1000Qemu options: -no-acpi
- Press Save and just added image will appear into Qemu Host images list
Create topology and drop Qemu host on workspace

Start and Configure R1
Current configuration : 946 bytes!upgrade fpd autoversion 12.4service timestamps debug datetime msecservice timestamps log datetime msecno service password-encryption!hostname R1!boot-start-markerboot-end-marker!logging message-counter syslogenable password cisco!aaa new-model!!aaa authentication login SSH-LOGIN local!!aaa session-id commonip source-routeip cef!!!!ip domain name cisco.comno ipv6 cef!multilink bundle-name authenticated!!username cisco password 0 ciscoarchivelog confighidekeys!!interface Loopback0ip address 192.168.0.1 255.255.255.0!interface FastEthernet0/0ip address 10.10.10.1 255.255.255.0duplex half!ip forward-protocol ndno ip http serverno ip http secure-server!control-plane!gatekeepershutdown!!line con 0stopbits 1line aux 0stopbits 1line vty 0 4password ciscologin authentication SSH-LOGINtransport input telnet ssh!end
Remember to type crypto key generate command in config mode to get SSH enabled.
Start Qemu host and assign ip address and default gateway
- Start Qemu Host by right clicking and pressing Start button Qemu window will open
- Assign IP address for eth0 interface using command:
sudo su
ifconfig eth0 10.10.10.2 netmask 255.255.255.0 up
- To verify what ip address eth0 interface has use following command
ifconfig eth0
- You can also set hostname to host using hostname command:
hostname Qemu1
Try to reach directly connected network
- Try to ping router (10.10.10.1) stop by pressing CRTL + C.

Setup default gateway to reach remote networks

Using telnet and SSH


Making IP-address and default gateway persistent
- To make settings persistent do following:
sudo su
vi /opt/bootlocal.sh
- Add follwing lines to the file:
hostname Qemu1
ifconfig eth0 10.10.10.2/24
route add default gw 10.10.10.1
- Save file:
- Press Esc
- Type :wq!
- Run following command:
/usr/bin/filetool.sh backup
Running multiple host simultaneously
Using console connection
Special Thanks to Jaakko Rautanen for making this tutorial .
Read More
20
comments
How to install a loopback interface in Linux for GNS3.
After successful installation of GNS3, we will install loopback adapter on our Ubuntu, Centos, Redhat and Fedora systems, so that we can telnet into your routers.
Loopback tap installation on Ubuntu
user@admin-desktop:~$ sudo –i
root@ admin-desktop:~#apt-get install uml-utilities
root@ admin-desktop:~#modprobe tun
root@ admin-desktop:~#tunctl This will create loopback interface tap0
root@ admin-desktop:~#ifconfig tap0 10.100.100.100 netmask 255.255.255.0 up
root@ admin-desktop:~#ifconfig verify that tap0 is up and given ip is assigned.
If you want to add one more loopback interface
root@ admin-desktop:~#tunctl This will create loopback interface tap1
root@ admin-desktop:~#ifconfig tap1 10.100.101.100 netmask 255.255.255.0 up
********************************************************************************
Loopback tap installation on Centos/Redhat/Fedora
We need tunctl which is not available in our local repositories. So we’ll have to add RPMForge repository. Steps to add this repo is given here
http://wiki.centos.org/AdditionalResources/Repositories/RPMForge (Steps are the same for other 2 distros as well)
Ok lets install tunctl
[user@admin ~]$ su
Password: (Type in your root password here)
[root@admin /]# yum install tunctl
[root@admin /]# modprobe tun
[root@admin /]# cd /usr/sbin
[root@admin sbin]#./tunctl This will create loopback interface tap0
[root@admin sbin]# /sbin/ifconfig tap0 10.100.100.100 netmask 255.255.255.0 up
[root@admin sbin]# /sbin/ ifconfig verify that tap0 is up and given ip is assigned.
If you want to add one more loopback interface
[root@admin sbin]#./tunctl This will create loopback interface tap1
[root@admin sbin]# /sbin/ifconfig tap1 10.100.101.100 netmask 255.255.255.0 up
Change the ip with ifconfig according to your requirement.
Run GNS3 with root privileges, or you won’t be able to add these tap interfaces to GNS3.
Fire up GNS3
Drag the cloud onto the work-board and right click on it, Select Configure. Then Select NIO TAP, type tap0, press Add. Click Apply & ok. Now connect it to your router.
Important: Add these lines to iptables
sudo iptables -I INPUT -j ACCEPT -i tap0
sudo iptables -I OUTPUT -j ACCEPT -o tap0
Happy Learning :)
Read More
5
comments
How To Install GNS3 on Ubuntu 10.04 LTS
So here is how to install GNS3 on Ubuntu.
These steps works for Ubuntu 9.10, 10.04lts and 10.10.
Lets Begin
sudo apt-get update
sudo apt-get install dynagen python-qt4
IMP: While installing Dynagen and python-qt4 on 10.10, if you get
Unable to locate package dynagen/python-qt. Manually download these packages from here https://launchpad.net/ubuntu/maverick/+package/dynagenhttps://launchpad.net/ubuntu/maverick/+package/python-qt42. Download GNS3 and extract in /opt
cd /opt
sudo wget http://space.dl.sourceforge.net/project/gns-3/GNS3/0.7.3/GNS3-0.7.3-src.tar.bz2
sudo tar -xjvf GNS3-0.7.3-src.tar.bz2
sudo rm GNS3-0.7.3-src.tar.bz2
sudo mv GNS3-0.7.3-src /opt/GNS3
If you get timeout while downloading GNS3 source file, Please manually download GNS3-0.7.3-src.tar.bz2 from here http://sourceforge.net/projects/gns-3/files/
3. Create the following directories in Ubuntu:
These directories will be used by GNS3 – such as projects – where your working projects will be stored, cache, temp, IOS images, etc.
cd /opt/GNS3
sudo mkdir Dynamips
sudo mkdir IOS
sudo mkdir Project
sudo mkdir Cache
sudo mkdir tmp
sudo chmod o+rw -R ./Project
sudo chmod o+rw -R ./tmp
sudo chmod o+rw -R ./IOS
4. Download binary of dynamips and make it executable
cd Dynamips
sudo wget http://www.ipflow.utc.fr/dynamips/dynamips-0.2.8-RC2-x86.bin
sudo chmod +x ./dynamips-0.2.8-RC2-x86.bin
4.1 Qemu installation
sudo apt-get install qemu
You can create a desktop shortcut on Ubuntu by right-clicking on the desktop and select “Create Launcher..”, Name it GNS3 and in the command section type in
python "/opt/GNS3/gns3"
Double click to open GNS3 and we will edit the default settings. If you don’t want to use desktop icons you can create a launcher from your programs menu by right clicking on the Main Menu, selecting Edit Menu. Select New Item on the right and you will be presented with the same window where you type in the above. From there you can move the launcher into any menu section of your choice.
5. Go to edit | preferences and in the ‘Terminal command:’ section type in:
gnome-terminal -t %d -e 'telnet %h %p' > /dev/null 2>&1 &
6. Under ‘Paths’ change the ‘Project directory:’ to
/opt/GNS3/Project
and the ‘IOS/PIX directory:’ to
/opt/GNS3/IOS
7. Click on Dynamips tab on the left
For the ‘Executable path:’ type in
/opt/GNS3/Dynamips/dynamips-0.2.8-RC2-x86.bin
8. Change the ‘Working directory:’ to
/opt/GNS3/tmp
Click on the Capture tab on the left
9. For the ‘Working directory for capture files:’ change it to
/opt/GNS3/Project
sudo apt-get install dynagen python-qt4
this one won’t work in 64 bit …
Instead follow this steps
Open up Terminal
sudo apt-get update
sudo apt-get install python
sudo apt-get install qt4-dev-tools
sudo apt-get install pyqt4-dev-tools
exit
Rest of the steps are same as 32-bit, Only in Step 4
Download http://www.ipflow.utc.fr/dynamips/dynamips-0.2.8-RC2-amd64.bin
move it to /opt/GNS3/Dynamips
Then make dynamips-0.2.8-RC2-amd64.bin executable.
sudo chmod +x ./dynamips-0.2.8-RC2-amd64.bin
After you have done all that you will be able to Open and Save your GNS3 projects properly and have an efficient setup for GNS3. In order to use the devices in GNS3 you must obtain our own IOS images from Cisco or get it from here.
Want to add loopback interface in ubuntu, please read here.
Read More
37
comments
Emulate ASA in GNS3 on Centos/Redhat/Fedora
After successful installation of GNS3 on Centos/Fedora/Redhat, we'll now compile/patch qemu from the source and then extract initrd and kernel files from ASA(asa802-k8.bin) to use with Qemu.
IMP:::This tutorial is based upon the assumption that you have installed GNS3 under /opt/GNS3, Please check here .
First I'll show you Qemu Patch/Compilation part .
First we'll have to install dependencies
[user@admin ~]$ su
Password: (Type in your root password here)
[root@admin /]# yum install ncurses ncurses-devel zlib zlib-devel SDL SDL-devel libpcap libpcap-devel
Let's download and compile Qemu
[root@admin /]#cd /opt/GNS3/
[root@admin GNS3]#wget http://download.savannah.gnu.org/releases/qemu/qemu-0.11.0.tar.gz
[root@admin GNS3]#tar xvzf qemu-0.11.0.tar.gz
[root@admin GNS3]#cd qemu-0.11.0
[root@admin qemu-0.11.0]#wget http://downloads.sourceforge.net/gns-3/qemu-0.11.0-olive.patch?download
[root@admin qemu-0.11.0]#patch -p1 -i qemu-0.11.0-olive.patch
[root@admin qemu-0.11.0]#./configure --target-list=i386-softmmu
[root@admin qemu-0.11.0]#make
[root@admin qemu-0.11.0]#make install
We are done with Qemu compilation, next is ASA.
[root@admin qemu-0.11.0]#cd ..
[root@admin GNS3]#cd IOS
[root@admin IOS]#mkdir ASA
[root@admin IOS]#chmod o+rw -R ./ASA
[root@admin IOS]#cd ASA
[root@admin ASA]#
now download and move if you need pre-configured files asa802-k8.bin leave a comment below along with your e-mail id I'll send the files ASAP or you can google 4 it to this ASA folder.
::coloured coded text is the output of the command::
[root@admin ASA]#hexdump -C asa802-k8.bin > asa802-k8.hex
[root@admin ASA]#grep '1f 8b 08 00 1d' asa802-k8.hex
001228b0 1f 8b 08 00 1d 3d 73 46 00 03 ec 3a 6d 54 14 57 |.....=sF...:mT.W|
[root@admin ASA]#ls -la asa802-k8.bin
-rwxrwxrwx 1 cyberwiz cyberwiz 14524416 Jun 25 18:48 asa802-k8.bin
[root@admin ASA]#echo "14524416 ; ibase=16 ; last - 1228B0" | bc | tail -n 1
13334352
[root@admin ASA]#tail -c 13334352 asa802-k8.bin > asa802-k8.gz
[root@admin ASA]#gzip -d asa802-k8
gzip: asa802-k8.gz: decompression OK, trailing garbage ignored
[root@admin ASA]#mkdir tmp ; cd tmp
[root@admin tmp]#cpio -i --no-absolute-filenames --make-directories < ../asa802-k8
cpio: Removing leading `/' from member names
cpio: Removing leading `/' from member names
61039 blocks
[root@admin tmp]#cp vmlinuz ../asa802-k8.kernel
[root@admin tmp]#cd asa/scripts/
[root@admin scripts]#gedit first_start.sh
Now copy and paste the following in the gedit:
#!/bin/sh
##
## Author: Jeremy Grossmann (2009)
## Contributor: J. Pedro Flor (28 january 2010)
##
FIRST_START=no
if test ! -e /mnt/disk0/lina_monitor
then
cd /asa/scripts/
echo "d" > /asa/scripts/fdisk.pf.in
echo "o" >> /asa/scripts/fdisk.pf.in
echo "n" >> /asa/scripts/fdisk.pf.in
echo "p" >> /asa/scripts/fdisk.pf.in
echo "1" >> /asa/scripts/fdisk.pf.in
echo "1" >> /asa/scripts/fdisk.pf.in
echo "" >> /asa/scripts/fdisk.pf.in
echo "t" >> /asa/scripts/fdisk.pf.in
echo "4" >> /asa/scripts/fdisk.pf.in
echo "w" >>/asa/scripts/fdisk.pf.in
echo ""
echo -n "Initializing partition..."
/sbin/fdisk /dev/hda < /asa/scripts/fdisk.pf.in > /dev/null 2> /dev/null
echo "done"
echo ""
echo -n "Formating and mounting partition..."
mkdosfs -F 16 /dev/hda1 > /dev/null 2> /dev/null
mount -t vfat -o umask=0000,noatime,check=s,shortname=mixed /dev/hda1 /mnt/disk0 > /dev/null 2> /dev/null
echo "done"
echo ""
cp /asa/bin/lina /mnt/disk0/lina
cp /asa/bin/lina_monitor /mnt/disk0/lina_monitor
FIRST_START=yes
fi
# load drivers
modprobe e100
modprobe e1000
ifconfig eth0 up
ifconfig eth1 up
ifconfig eth2 up
ifconfig eth3 up
ifconfig eth4 up
ifconfig eth5 up
if test $FIRST_START = yes
then
echo ""
echo " Cisco ASA with
echo " =============================================="
echo ""
echo "This is your first boot, please wait about 2 minutes for 'disk0' creation"
echo "and then execute the following commands inside the Linux prompt:"
echo ""
echo " # cd /mnt/disk0"
echo " # /mnt/disk0/lina_monitor"
echo ""
echo ""
echo ""
echo "Please note to use the following command under ASA to save your configs:"
echo ""
echo " ciscoasa(config)# boot config disk0:/.private/startup-config"
echo " ciscoasa(config)# copy running-config disk0:/.private/startup-config"
echo ""
echo ""
echo ""
echo "To get webvpn working, execute the following commands:"
echo ""
echo " ciscoasa# mkdir disk0:/var"
echo " ciscoasa# mkdir disk0:/var/log"
echo " ciscoasa# mkdir disk0:/csco_config"
echo " ciscoasa# mkdir disk0:/csco_config/97"
echo " ciscoasa# mkdir disk0:/csco_config/97/webcontent"
echo ""
echo " ( Powered by Pedro Flor )"
echo " ( pedro.flor@gmail.com )"
echo ""
exit
fi
echo ""
echo ""
echo "Starting Cisco ASA with
echo ""
cd /mnt/disk0
/mnt/disk0/lina_monitor
Save and close gedit.
[root@admin scripts]#chmod 755 first_start.sh
[root@admin scripts]#cd ../../etc/init.d/
[root@admin init.d]#gedit rcS
Comment out the lina_monitor line and add /asa/scripts/first_start.sh, it should look like.
#!/bin/sh
#------------------------------------------------------------------
# Copyright (c) 2006, 2007 by Cisco Systems, Inc.
# All rights reserved.
#------------------------------------------------------------------
export MOUNT_OPTS=umask=0000,noatime,check=s,posix,shortname=mixed
/bin/sh -c /etc/init.d/rcS.common
export LD_LIBRARY_PATH=/mnt/disk0/lib:/mnt/disk0/lib
# launch our user space processes
#/asa/bin/lina_monitor
/asa/scripts/first_start.sh
Save and close gedit.
[root@admin init.d]#cd ../../
[root@admin tmp]#find . | cpio -o -H newc | gzip -9 > ../asa802-k8.initrd.gz
61045 blocks
Lets cleanup ASA folder(Optional)
[root@admin tmp]#cd ..
[root@admin ASA]#rm -rf asa802-k8 asa802-k8.hex asa802-k8.bin tmp/*
[root@admin ASA]#rmdir tmp
Qemu Settings.

ASA Settings.

Drag and Start the ASA, then right click, Select Console.
First time you save your config, do as follows:
ciscoasa(config)# boot config disk0:/.private/startup-config
ciscoasa(config)# copy running-config disk0:/.private/startup-config
Before switching ASA off, run one more time the following:
ciscoasa#copy run disk0:/.private/startup-config
Hope this tutorial will help you guys to Setup Qemu and Emulate ASA successfully on GNS3.
Happy Learning :)
Read More
25
comments
(Tutorial) How To Install GNS3 on Centos/Redhat/Fedora .
OK lets roll
First we'll have to install dependencies
[user@admin ~]$ su
Password: (Type in your root password here)
[root@admin /]# yum install python python-devel xorg-x11-proto-devel libXext-devel
[root@admin /]# yum install gcc-c++
Now we'll download and install Qt4
[root@admin /]#cd /tmp
[root@admin tmp#wget ftp://ftp.qt.nokia.com/qt/source/qt-x11-opensource-src-4.5.1.tar.gz
[root@admin tmp]#tar xzf qt-x11-opensource-src-4.5.1.tar.gz
[root@admin tmp]# cd qt-x11-opensource-src-4.5.1
[root@admin qt-x11-opensource-src-4.5.1]#./configure -nomake examples -nomake demos -qt-gif -no-exceptions -debug -qt3support
[root@admin qt-x11-opensource-src-4.5.1]#gmake <====This might take 2-3 hrs.
[root@admin qt-x11-opensource-src-4.5.1]#gmake install <====Another 30 mins or so
[root@admin qt-x11-opensource-src-4.5.1]#PATH=/usr/local/Trolltech/Qt-4.5.1/bin:$PATH
[root@admin qt-x11-opensource-src-4.5.1]#export PATH
Next we'll install SIP
[root@admin qt-x11-opensource-src-4.5.1]#cd ..
[root@admin tmp]#wget http://code.enthought.com/src/sip-4.8.1.tar.gz
[root@admin tmp]#tar xzf sip-4.8.1.tar.gz
[root@admin tmp]#cd sip-4.8.1
[root@admin sip-4.8.1]#python configure.py
[root@admin sip-4.8.1]#make
[root@admin sip-4.8.1]#make install
Next we'll Install PyQt4
[root@admin sip-4.8.1]#cd ..
[root@admin tmp]#wget http://ftp.pardus.org.tr/pub/source/2009/PyQt-x11-gpl-4.5.2.tar.gz
[root@admin tmp]#tar xzf PyQt-x11-gpl-4.5.2.tar.gz
[root@admin tmp]#cd PyQt-x11-gpl-4.5.2
[root@admin PyQt-x11-gpl-4.5.2]#python configure.py
[root@admin PyQt-x11-gpl-4.5.2]#make <=====This will take 30-60 mins
[root@admin PyQt-x11-gpl-4.5.2]#make install
We are done with compiling part, now lets download GNS3 source files
[root@admin tmp]#cd /opt
[root@admin opt]#wget http://nchc.dl.sourceforge.net/project/gns-3/GNS3/0.7.4/GNS3-0.7.4-src.tar.bz2
[root@admin opt]#tar -xjvf GNS3-0.7.4-src.tar.bz2 && rm GNS3-0.7.4-src.tar.bz2
[root@admin opt]#mv GNS3-0.7.4-src /opt/GNS3
Create the following directories:
These directories will be used by GNS3 – such as projects – where your working projects will be stored, cache, temp, IOS images, etc.
[root@admin opt]#cd /opt/GNS3
[root@admin GNS3]#mkdir Dynamips
[root@admin GNS3]#mkdir IOS
[root@admin GNS3]#mkdir Project
[root@admin GNS3]#mkdir Cache
[root@admin GNS3]#mkdir tmp
[root@admin GNS3]#chmod o+rw -R ./Project
[root@admin GNS3]#chmod o+rw -R ./tmp
[root@admin GNS3]#chmod o+rw -R ./IOS
Download binary of dynamips and make it executable
[root@admin GNS3]#cd Dynamips
[root@admin Dynamips ]#wget http://www.opendrive.com/files/25226584_Cmocn_9400/dynamips-0.2.8-RC3-x86.bin
[root@admin Dynamips ]#chmod +x ./dynamips-0.2.8-RC3-x86.bin
IMP:: For 64-bit users (I don't have Dynamips 0.2.8 RC3 for 64 bit, if you have it please share it with me)
[root@admin Dynamips ]#wget http://www.ipflow.utc.fr/dynamips/dynamips-0.2.8-RC2-amd64.bin
[root@admin Dynamips ]#chmod +x ./dynamips-0.2.8-RC2-amd64.bin
You can create a desktop shortcut by right-clicking on the desktop and select “Create Launcher..”, Name it GNS3 and in the command section type in
python "/opt/GNS3/gns3"
Double click to open GNS3 and we will edit the default settings. If you don’t want to use desktop icons you can create a launcher from your programs menu by right clicking on the Main Menu, selecting Edit Menu. Select New Item on the right and you will be presented with the same window where you type in the above. From there you can move the launcher into any menu section of your choice.
Fire up GNS3
* Go to edit | preferences and in the ‘Terminal command:’ section type in:
gnome-terminal -t %d -e 'telnet %h %p' > /dev/null 2>&1 &
* Under ‘Paths’ change the ‘Project directory:’ to
/opt/GNS3/Project
and the ‘IOS/PIX directory:’ to
/opt/GNS3/IOS
* Click on Dynamips tab on the left
For the ‘Executable path:’ type in
/opt/GNS3/Dynamips/dynamips-0.2.8-RC3-x86.bin
* Change the ‘Working directory:’ to
/opt/GNS3/tmp
Click on the Capture tab on the left
* For the ‘Working directory for capture files:’ change it to
/opt/GNS3/Project
Imp:: When you want to stop the router, use right click stop on the router.
After you have done all that, you will be able to Open and Save your GNS3 projects properly and have an efficient setup for GNS3. In order to use the devices in GNS3 you must obtain our own IOS images from Cisco or http://networkingtips-tricks.blogspot.com/2010/03/cisco-ios-collection-for-gns3-and.html
[user@admin ~]$ su
Password: (Type in your root password here)
[root@admin /]#wget http://www.python.org/ftp/python/2.6.6/Python-2.6.6.tgz tar -zxvf Python-2.6.6.tgz cd Python-2.6.6 ./config && make && make install
Add the install path (/usr/local/bin/python : by default) to ~/.bash_profile as follow :
PATH=$PATH:$HOME/bin:/usr/local/bin/python2.6
Now follow the steps given at the top page,
Change python configure.py to python2.6 configure.py under Next we'll install SIP and Next we'll Install PyQt4.
Hope this tutorial will help you guys to setup and run GNS3 on your Linux system.
Just the right place to find a schadenfreude
Happy Learning
Read More
68
comments
Linux Multilayer Switch Emulator for GNS3
LiSA , short for Linux Switching Appliance, is an open-source software project built for the GNU/Linux operating system that aims to provide its users with all the necessary instruments for implementing and maintaining an e ficient and reliable switching solution at a low cost.
The project was designed to be used in medium and small-sized networks. As opposed to usual hardware-driven implementations, LiSA offers a software approach to switching by utilizing the Linux Kernel networking stack and adding its own switch-speci c functionality.
Since LiSA is practically a software implementation of what normally is a hardware-based logic, it might seem that there is no advantage in using it. On the contrary, LiSA provides several bene ts that hardware implementations do not have.
Many of these advantages stem from the fact that it is based on the Linux operating system.
First of all this means it is not tied to a speci c hardware architecture. It is only limited to the architectures supported by Linux, of which we mention : ARM, x86, MIPS, PowerPC and many more2.
Secondly, it is not dependant on the network hardware. As long as there is a Linux device driver for the speci c NIC which LiSA is supposed to handle, no problems will be encountered.
Finally, Linux is well-known for its ability to run well on older systems and on embedded devices, that is, devices that have important resource constraints. This provides an advantage since one of LiSA's main objectives is to run on such devices.
The project will not compete with Cisco (we could not do that anyway) but should provide a cost-effective advanced-featured solution for small networks.

LISA can perform both L2 and L3 switching and configuration is similar to Cisco IOS.
The LISA Project page:
http://lisa.mindbit.ro/
This is a Centos linux with LISA preinstalled Qemu Image.
Download Links:
http://rapidshare.com/files/412464772/lisa-centos-2.0.2.part01.rar.html
http://rapidshare.com/files/412464773/lisa-centos-2.0.2.part02.rar.html
http://rapidshare.com/files/412464774/lisa-centos-2.0.2.part03.rar.html
Configure in Qemu host settings in GNS3Qemu Image: set path to lisa-centos.img
RAM: 256 MB
NIC: rtl8139
Networking
Place Qemu host icon on GNS3 desktop and start it. Right click on Qemu Host and select Console.
Login to Centos with root account.
Login/password: root/password
To get console of switch just type command "swcli"
Configuration is Cisco like so you shouldn't have problem to setup Vlans, trunks, access ports etc.
Compare to real Cisco switch you need to define ethernet interfaces in config mode of swcli
S(config)# interface Ethernet 0
S(config-if)#exit
After that you should see Ethernet 0 in running-config. Do it for all interfaces you use for switching.
Thanks to brezular@gns3.net
Original post can be found @ http://www.gns3.net/phpBB/topic2403.html
Happy Learning :)
Read More
2
comments
Cisco Ios Collection For Gns3 And Actual Routers.
Guys , I'm sharing with you FTP Direct Download links for Cisco IOS Images which can be used with GNS3 or actual routers.
Small Collection of IOS Images.
ftp://ftp.unikon-ua.net/pub/Cisco/IOS/
{Updated}Big Collection of IOS Images (Almost All Cisco IOS Images)
ftp://62.117.115.92/upload/ios/
Another Big Collection
ftp://86.110.172.101/Soft/IOS/
(NEW)Cisco IOS Images Big Collection v3. **Direct HTTP Link**
http://www.jonsfiles.com/IOS%20Images%20for%20GNS3/Cisco_IOS_Collection/IOS/http://www.intranet.betomt.com.br/repositorio/IOS/CISCO/
ASA Binary files for GNS3
http://www.4shared.com/dir/5716575/72cbe353/IOS.html
New Big IOS Collection 10 Sept 2010
ftp://79.120.76.25/torrent/downloaded/ios/
Use Google search for Cisco IOS Images, Type the following in search box "index of ios parent directory bin" (without quotes)
Happy Learning..
Read More
32
comments
How To Install GNS3 in Ubuntu 9.10
So here is how to install GNS3 and have it work efficiently for your Cisco studying needs.
1. First we will install Dynagen and Python-Qt4
sudo apt-get install dynagen python-qt4
2. Download GNS3 and extract in /opt
cd /opt
sudo wget http://downloads.sourceforge.net/project/gns-3/GNS3/0.7/GNS3-0.7-
src.tar.bz2?use_mirror=softlayer
sudo tar -xjvf GNS3-0.7-src.tar.bz2 && rm GNS3-0.7-src.tar.bz2
sudo mv GNS3-0.7-src /opt/GNS3
3. Create the following directories:
These directories will be used by GNS3 – such as projects – where your working projects will be stored, cache, temp, IOS images, etc.
cd /opt/GNS3
mkdir Dynamips
mkdir IOS
mkdir Project
mkdir Cache
mkdir tmp
chmod o+rw -R ./Project
chmod o+rw -R ./tmp
4. Download binary of dynamips and make it executable
cd Dynamips
sudo wget http://www.ipflow.utc.fr/dynamips/dynamips-0.2.8-RC2-x86.bin
sudo chmod +x ./dynamips-0.2.8-RC2-x86.bin
You can create a desktop shortcut by right-clicking on the desktop and select “Create Launcher..”, Name it GNS3 and in the command section type in
python "/opt/GNS3/gns3"
Double click to open GNS3 and we will edit the default settings. If you don’t want to use desktop icons you can create a launcher from your programs menu by right clicking on the Main Menu, selecting Edit Menu. Select New Item on the right and you will be presented with the same window where you type in the above. From there you can move the launcher into any menu section of your choice.
5. Go to edit | preferences and in the ‘Terminal command:’ section type in:
gnome-terminal -t %d -e 'telnet %h %p' > /dev/null 2>&1 &
6. Under ‘Paths’ change the ‘Project directory:’ to
/opt/GNS3/Project
and the ‘IOS/PIX directory:’ to
/opt/GNS3/IOS
7. Click on Dynamips tab on the left
For the ‘Executable path:’ type in
/opt/GNS3/Dynamips/dynamips-0.2.8-RC2-x86.bin
8. Change the ‘Working directory:’ to
/opt/GNS3/tmp
Click on the Capture tab on the left
9. For the ‘Working directory for capture files:’ change it to
/opt/GNS3/Project
After you have done all that you will be able to Open and Save your GNS3 projects properly and have an efficient setup for GNS3. In order to use the devices in GNS3 you must obtain our own IOS images from Cisco.
Read More
0
comments
GNS3 Configuration Guide

GNS3 is actually the graphical front-end of Dynamips/Dynagen and allows you to drag-and-drop routers onto a stage, connect them up, run IOS on them, and save their configs, just as if you had your own network. It can be a little confusing to set up first of all so I will present a step-by-step guide below of how to install and configure GNS3 including a couple of advanced options which will allow you to run Cisco Security Device Manager (SDM) on your PC.
Installation and Configuration
This process needs to be done only the once.
1. Download GNS3 from http://rapidshare.com/files/357340037/GNS3-0.7-win32-all-in-one.exe and install, accepting the various license agreements etc.
2. You now need a Cisco IOS. Get one from http://rapidshare.com/files/359743007/CisIOS.7z
3. Now open up GNS3.

4. Go to Edit-->IOS Images and Hyper visors and you should get a screen similar to below.

5. In the Settings section you need to point to the IOS image you copied in Step 2 then click on Save. The value of the IDLE PC section will be blank and leave blank for now. Now click on Close.
6. Now go to Edit-->Preferences then click on Dynamips on the left-hand side. You should get a screen similar to below.

7. The executable path should point to the dynamips-wxp.exe in the Program Files directory. Change the Working Directory to a desired folder then click on the Test button. You should see that Dynamips has successfully started, if so click Apply then OK. If not you should double-check the Executable Path and the Working Directory:

8. On the main screen drag a router onto the main screen then right-click on it and show hostname. Now click on Emulation Mode.

9. Click on the Play button on the tool bar to start the Cisco IOS.
10. In the bottom pane marked “Console” type console R0 to set up a console session with your router similar to below.

11. Say “No” to initial configuration dialog until you get to the Router> prompt. Now type enable to go into Enable mode.
12. Go back to the GNS3 session (screen shot in Step 8) KEEPING THE CONSOLE SESSION OPEN.
13. Type idlepc get your-router-name for example idlepc get R0 and wait for some idlepc values to be displayed. Make a note of these values and click Cancel.

14. By default Dynamips will take up 100% of your CPU usage and you need to specify an idlepc value to get that changed. Close down the console session and go to Design Mode in GNS3. Open up Task Manager on your PC (usually CTRL-ALT-DELETE) then go to the Performance tab.

15. Go to Edit-->IOS Images and Hypervisors and select the IOS you identified in Step 4 then click on Edit. Enter the first idlepc value you wrote down from Step 13 then click on Save then Close.
16. Go back into Emulation mode then start the IOS again then console to the router. View the CPU utilization in Task Manager and see if it falls below 5%. If it stays at 100% then go back to step 15 and change the idlepc value to the next one in the list. Repeat this until you get an idlepc value that has the CPU utilization at around 5% or less.
You have now successfully installed and configured GNS3.
Configuring a Serial Interface on a Router
By default the 3660 image that I use comes with 2 Fast-Ethernet interfaces. In order to simulate WAN links you need to add serial interfaces to the router as outlined below.
1. Right-click on your router in Design Mode then click Configure then on your router name.
2. Click on the slots tab and change slot 1 (or any other slot other than slot 0) to NM-4T. This will provide you with 4 serial interfaces. NOTE THAT THE SLOT NAME MAY BE DIFFERENT DEPENDING ON WHICH IOS YOU USE.

3. Click on Apply then OK.
Adding a switch module to your router
Follow the same steps as you did for configuring a serial interface but choose the NM-16ESW module from the drop-down list.
Connecting two or more routers
You will come to the point where configuring just one router is not sufficient such as when you want to run a routing protocol. The following guidelines show you how to connect routers together.
1. Drag two or more routers onto the stage and configure their slots if required. Display their hostnames by pressing the ABC button on the toolbar.

2. Now click on the interface button on the toolbar and select Manual.

The interface button changes to a red cross.

Now left-click on a router and select an interface which you want a cable connected to. Now click the router to which you want to connect to and select the interface on that router for the other end of the link. You should now see the link has been drawn. Once you have finished configuring the interfaces click the interface button (red cross) to get out of interface configuration mode (the icon will revert to the telephone jack symbol). The picture below shows three routers with a Fast-Ethernet connection and the other with a Serial link (zig-zag line).

3. Notice that each link has got a red dot on it. When you go back into Emulation Mode and start the IOS, each dot should turn to green which denotes that each router has successfully started the IOS.
Saving your configuration
After all your hard work on the command line you will probably want to save your configuration and reuse it on another day. Follow the steps below to save your work:
1. In Emulation Mode go to FileSave As and save your topology where you want as a .net file. When it comes to reusing this topology just double-click on the .net file to open it up in GNS3.
2. On each router save your config using copy run start
3. Back in Emulation Mode type save /all to save all of the configs into the .net file. If you want to save the config of only one router you can replace the keyword all with the name of the router you wish to save the config of.
Configuring a host in the network (Advanced)
There may be an occasion when you want to connect a host in your topology such as running Cisco’s Security Device Manager (use of this may figure in future CCNA exams). To do this you must first configure a Loop-back Adapter on your PC.
1. Go to Control Panel-->Add Hardware then click Next
2. Yes I have already connected the hardware
3. Scroll to the bottom and click on Add a new hardware device then Next
4. Install the hardware that I manually select from a list (Advanced)
5. Click on Network Adapters then Next
6. Select Microsoft as the Manufacturer then on Microsoft Loop-back Adapter under Network Adapter then click Next then Next again.
7. Open up Control Panel-->Network Connections to see the adapter in place.
Now that you have created a loop-back adapter you will want to connect it to a router. To do this, follow these steps:
1. In the GNS3 installation directory run the Network Device List.bat file which will give you the Ethernet address of your Loop-back Adapter.

Notice the second adapter shown where description is MS Loop-back Driver. I have renamed the adapter as Loop-back Adapter for SDM. We are interested in the NIO_gen_eth string.
2. Go into GNS3 and drag a cloud onto the stage.
3. Right-click the cloud and select configure.
4. Choose your cloud from the list.
5. In the Generic Ethernet NIO section select your Loop-back Adapter from the drop-down list (the one that matches what is shown in Step 1) and click on Add, Apply, the OK.

6. Now connect a Fast-Ethernet port on your router to the cloud as you would connect two routers.
7. Configure an IP address and subnet mask on the router interface connected to the cloud and bring the interface up.
8. Go to Control Panel-->Network Connections and right-click your adapter. Choose Properties then Internet Protocol (TCP/IP) and give it an IP address in the same subnet as the router’s Fast-Ethernet interface with the same subnet mask and with a default gateway matching the IP address of the router’s interface.
Example:
Router’s Fast-Ethernet 0/0 interface connected to the cloud:
On the router I would have something like:
Router(config)#int fa0/0
Router(config-if)#ip address 192.168.1.1 255.255.255.0
Router(config-if)#no shut
On the PC I would have something like:
IP address = 192.168.1.2
Subnet Mask = 255.255.255.0
Default Gateway = 192.168.1.1
You should now be able to ping between your PC and the router.
Running SDM (Advanced)
There may be a need to practice using the Cisco Security Device Manager (SDM) for your exam and the following steps show you how to configure it.
1. Download and install SDM from http://rapidshare.com/files/350073328/CisSdM.rar
2. Choose to only install SDM to your PC, NOT to the router.
3. Once installed you need to configure your router with the following commands:
Router#conf t
Router(config)#hostname SDMRouter
SDMRouter(config)#ip domain-name SDMDomain
Now configure your router with the following commands:
SDMRouter(config)#username your_username privilege 15 secret 5
SDMRouter(config)#ip http server
SDMRouter(config)#ip http secure-server
SDMRouter(config)#ip http authentication local
SDMRouter(config)#line vty 0 4
SDMRouter(config-line)#login local
SDMRouter(config-line)#transport input telnet ssh
SDMRouter(config-line)#privilege level 15
SDMRouter(config-line)#line cons 0
SDMRouter(config-line)#login local
SDMRouter(config-line)#transport input telnet ssh
SDMRouter(config-line)#privilege level 15
SDMRouter(config-line)#exit
SDMRouter(config)#crypto key generate rsa gen mod 1024
4. Now double-click the SDM icon and enter the IP address of the router and tick the box asking about HTTPS then click on Launch.

5. Ensure you allow pop-ups on your browser.
6. Enter username and password as defined after step 3.
7. Say yes to allow SDM to install.
You should now have a screen similar to the one below although this may be because I used a username and password of “cisco” which are the default.

8. Select a new username and password for the router then click OK. You should see the screen below then click OK.

9. You should now be in SDM and able to configure the router.
 Read More
1 comments
Read More
1 comments


